
If the quiz does not load, log into drive.google.com and come back to this page.
Tag Archives: quiz
Warm Up Quiz: 1/9
Please complete the warm up quiz below. You may use this week’s warm up to do the quiz. When you are finished, send your warm ups to me in an email. Thanks!
Warm Up Quiz: 11/8
Click here to log in to Google Drive if you do not see the quiz below
Warm Up Quiz 10/25
If the Quiz does not appear go to drive.google.com and log in to your google drive. After logging in come back to this page and refresh.
Thing 5 – Google Forms… and Flubaroo?
Google forms is an easy way to give online quizzes, polls, or feedback forms to your students, colleagues, or parents. In my class I do “Warm Ups” (Some might call it bell work, bell ringers, etc.) each day to either awaken prior knowledge on new material we are learning or to retrieve the previous day’s learning. At the end of each week I post to this site a simple google form that the students complete based on the warm ups. This way I don’t have to check, collect, or grade any papers! Instead, I have the google form. It collects the data, it can grade the quizzes, AND can email the students their results so they get immediate feedback too!
Here’s an example of one of my Warm Up Quizzes: Warm Up Quiz 9/27

Fig. 1 – My Google Drive
Now, here’s how you do it:
1. Log into your google drive and find the red button that says “create”. Click it an a drop down menu appears, choose “form”.
2. Give your form a title and start writing in questions. You can choose from different styles of questions like multiple choice, list, checkboxes, or just written text (although those become harder to grade in the next sections). I usually make the first question just “First Name” and leave as a short text question. At Cathedral, our forms can automatically collect our students’ email/log in. in order to send them their results you will need this info so make sure you check the box at the top marked, “Automatically collect respondent’s Cathedral High School username” (or you could make a question that asked respondents for their email address).
3. To add new questions you can either:
- Duplicate the previous question my pressing the button to the right of your first question that looks like one paper lying over another.
- Create a new question by pressing the button at the bottom of the page that says “Add Item”

Fig 2 – Google Form Tool Bar
4. This is important, if you plan on using this as a Quiz DO NOT MARK ANY CORRECT ANSWERS ON YOUR FORM. All that marking them does is place the mark on that answer so that when the student looks at it they see the correct answer marked for them.
5. When you’re finished, you can view your completed quiz by clicking “View live form” near the top of the page. But more importantly you want to be sure that the button to its left says “Accepting Responses”. This means your form can be viewed and filled out. If this is meant to be an actual quiz that you do not want students able to see at all times, simply click that button and it will change to “Not accepting responses”. (You can easily switch it back by pressing it again)
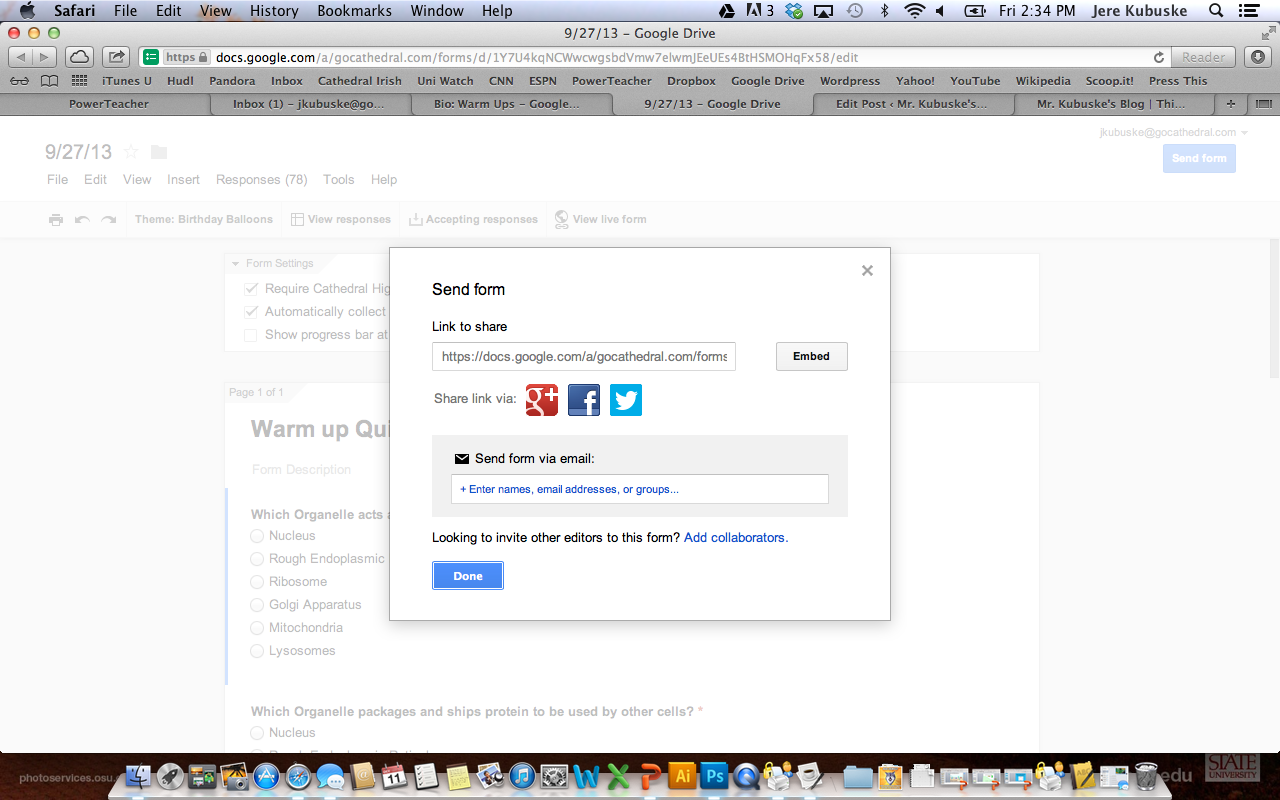
Fig. 3 – Send form options
6. When you are ready to share your quiz and make it like click the large blue button that says “Send form”. You can send the form (make it viewable) three different ways:
- Copy and paste the URL into your own blog or website
- Email your students (or whomever) using the window on the screen
- (What I use) You can choose to get the “Embed code” so that you can embed the quiz directly into your website.
Flubaroo

Fig. 4 – Google Spreadsheet
Now here’s where it gets fun. The other button in that bar says “View Responses” clicking this will take you to a new Google Spreadsheet that WILL AUTOMATICALLY COLLECT YOUR RESPONSES! (I know, right!?).
As you can see in this picture, Google automatically makes your questions the header on each column and places the students answers in them.
Grading
To have google automatically grade your assignment, click the tab titled “Tools”.
When the dropdown menu appears, the first item listed is “Script gallery”. Click that!

Fig. 5 – The Script Gallery
A box will appear with a list of scripts that google can run for you to analyze your data. The script you want is called FLUBAROO, so type that into the search bar. When it pulls up the result. Click “Install”.
It’s going to ask to be able to view some of your Google information, do not freak out! Its okay, it just needs permission to read the google spreadsheet so that it can grade it.
Once you have installed Flubaroo, there will be a new tab at the top titled “Flubaroo” (See Fig. 3 for proof). Click the tab and choose “Grade Assignment”. Now before you can grade your assignment, you will have had to have taken your own quiz to make a key. You will then use your response as your Key and compare your students answers to it.
Grade your assignment and Flubaroo will create a new ‘page’ to your spread sheet with data on student results.

Fig. 6 – The results of a recent assessment
Finally, to send your students their results, click the “Flubaroo” tab again and choose “Email grades”. You’ll have to identify which column of the responses is the email addresses before it can work its magic.
Finally, you can see a report on how your students did by clicking “View Report” in the Flubaroo tab. The report is simply a histogram of the grades, but it’s still pretty helpful.
Other Uses
Recently, I had my students create their own google quizzes, post them and then take other students quizzes. It was a fun way to 1. get them to review and 2. teach them a valuable skill.
Scroll to the bottom of this post and you can see their quizzes: Agenda 9/25
Now, there are more advanced techniques and tricks available if you’re interested. Please contact me if you would like more information. Otherwise, please complete my newest google form below!
Warm Up Quiz: 9/27
Class Agenda for 9/25
Biology: Follow these directions to help better prepare you for your test, which is scheduled for October 4th (Next Friday!)
- Complete your cell coloring
- Do the cell crossword puzzles (Label the parts as you fill in the crossword)
- Follow the directions listed below to create your own review quiz!
- Go to drive.google.com
- at the very bottom of the page, click the link that says ‘desktop’
- if the page appears with a warning, click ‘continue to desktop version’
- to the left of the new page, click the red box that says ‘create’ and then click ‘form’ on the drop down menu
- It will then open a new page with a pop up box
- Title: Your Name Cell Review
- Choose a skin
- press ‘ok’
- For your first question, put “Name:” in the question title. Then change the question type to ‘text’. Click ‘required question’ and then press ‘done’.
- Now press ‘add item’ and start writing your 1st of 10 questions. You can choose to make the question multiple choice, a list, text, or a paragraph. When your first question is finished, press ‘done’.
- To add your next questions press ‘add item’ and repeat #6.
- Once you’ve made your 10th question click ‘View Live Form’ in the bar near the top. This will allow you to preview your quiz and see how others will view it. If it is ready to publish, click the bar at the top that says ‘drive.google.com’ and it will change to the link for your specific quiz. Copy the entire link.
- Now, at the bottom of this post you’ll see a link that says ‘# comments’, click that link
- When the comment box appears, paste your link. Below that put your school email address in the email box, and your name – period in the name box.
- Finally, once you have posted your quiz, complete 3 quizzes from other students in the same period as you. Feel free to complete more than the three or complete quizzes from other classes too.
Tomorrow, I’ll show you how to check your responses so we can make sure everyone completed their assignment. Good luck making your quiz and email me if you have any questions. Have a great Wednesday!
Chemistry: Complete the Ch. 25 discovery questions (available as a PDF on the Chem page) using the iBook. Feel free to work with a partner.
Warm Up Quiz 8/16
Chemistry class: Click here for your Quiz
Biology: Complete the form below
If the quiz does not appear below, Go to http://www.google.com/drive and log in. After logging in, come back to this site and refresh the page. When you finish the Quiz, email me your ‘Note’
